ECS Infra Metrics and Logs Collection using Daemon Service
This documentation will guide you about how to collect metrics and logs from your ECS infrastructure using a daemon service. The daemon service will run a container in each nodes of your ECS cluster. The container will collect metrics and logs from the instance and send them to SigNoz.
Select the type of SigNoz instance you are running: SigNoz Cloud or Self-Hosted.
- SigNoz Cloud
- Self-Host
Prerequisites
- An ECS cluster running with at least one task definition
- ECS cluster of launch type EC2 or External
- SigNoz Cloud account
If you want to collect metrics and other data for Fargate launch type, checkout this documentation.
Select the type of ECS cluster you are running: EC2 or External.
- EC2
- External
Below are the steps to collect your metrics and logs from ECS infrastructure:
- Create a Daemon Service Template
- Create OpenTelemetry Collector Config file
- Create Daemon Service
- Verify Daemon Service
- Verify Data in SigNoz
- Clean Up (Optional)
Send Data from your Application deployed on ECS:
Setting up Daemon Service
Step 1: Daemon Service Template
This step creates a new service within your Amazon ECS (Elastic Container Service) cluster. The purpose of this service is to deploy a container that functions as a daemon. This service will run a container that will send data such as ECS infrastructure metrics and logs from docker containers and send it to SigNoz Cloud. It also acts as a gateway for any incoming OTLP telemetry data from your applications or services. This means it can receive telemetry data (such as traces and metrics) sent using OTLP from your applications, and then forward this data to SigNoz Cloud for analysis and visualization.
We will use CloudFormation template which includes parameters and configurations that define how the daemon service should be set up. For example, it specifies the container image to use for the daemon, the necessary environment variables, and network settings. The template is designed to be customizable, allowing you to adjust certain parameters to fit your specific ECS setup and requirements to create the daemon service with our custom parameters mentioned in Step 3.
Download the daemon-template.yaml using the command below:
wget https://github.com/SigNoz/benchmark/raw/main/ecs/ec2/daemon-template.yaml
Below are the steps to collect your metrics and logs from ECS infrastructure:
- Create a Daemon Service Template
- Create OpenTelemetry Collector Config file
- Create Daemon Service
- Verify Daemon Service
- Verify Data in SigNoz
- Clean Up (Optional)
Send Data from your Application deployed on ECS:
Setting up Daemon Service
Step 1: Daemon Service Template
This step creates a new service within your Amazon ECS (Elastic Container Service) cluster. The purpose of this service is to deploy a container that functions as a daemon. This service will run a container that will send data such as ECS infrastructure metrics and logs from docker containers and send it to SigNoz Cloud. It also acts as a gateway for any incoming OTLP telemetry data from your applications or services. This means it can receive telemetry data (such as traces and metrics) sent using OTLP from your applications, and then forward this data to SigNoz Cloud for analysis and visualization.
We will use CloudFormation template which includes parameters and configurations that define how the daemon service should be set up. For example, it specifies the container image to use for the daemon, the necessary environment variables, and network settings. The template is designed to be customizable, allowing you to adjust certain parameters to fit your specific ECS setup and requirements to create the daemon service with our custom parameters mentioned in Step 3.
Download the daemon-template.yaml using the command below:
wget https://github.com/SigNoz/benchmark/raw/main/ecs/external/daemon-template.yaml
Step 2: Create SigNoz OtelCollector Config

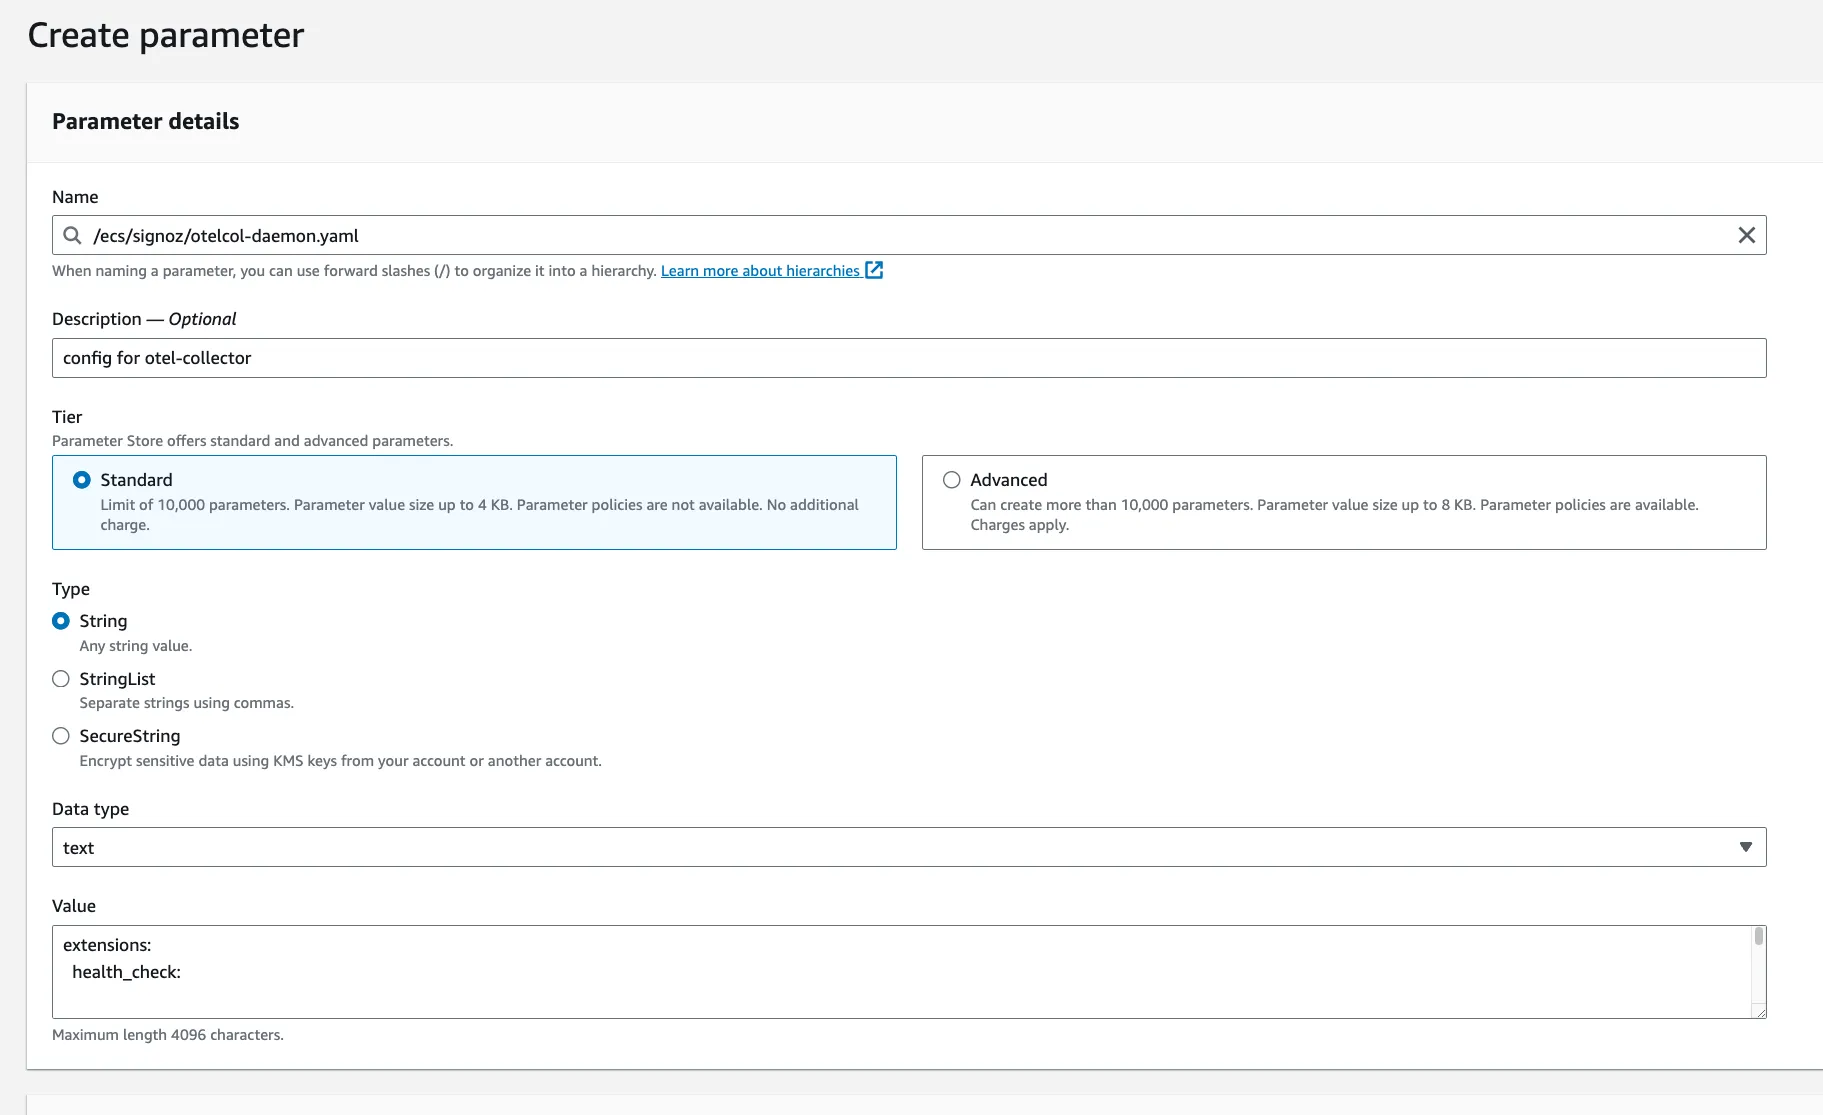
- Navigate to AWS Parameter Store and create a new parameter named
/ecs/signoz/otelcol-daemon.yaml.
- Download the otelcol-daemon YAML configuration file:
wget https://github.com/SigNoz/benchmark/raw/main/ecs/otelcol-daemon.yaml
- Update
{region}andSIGNOZ_INGESTION_KEYvalues in your YAML configuration file and copy the updated content of theotelcol-sidecar.yamlfile and paste it in the value field of the/ecs/signoz/otelcol-daemon.yamlparameter that you created.
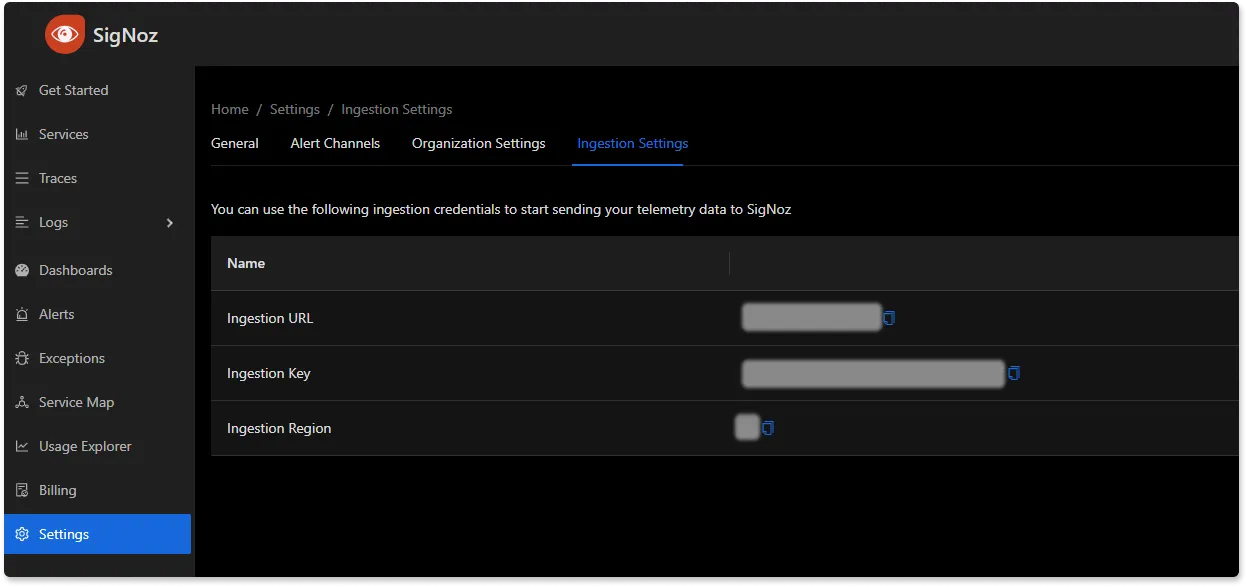
You will be able to get {region} and SIGNOZ_INGESTION_KEY values in your SigNoz Cloud account under Settings --> Ingestion Settings.

After successful set up, feel free to remove logging exporter if it gets too noisy. To do so, simply remove the logging exporter from the exporters list in the following pipelines: traces, metrics, and logs from the otelcol-daemon.yaml file.
Step 3: Create Daemon Service
Now configure the daemon service you created in Step 1 with the OpenTelemetry Collector (OTelCollector) configuration you prepared and stored in AWS Parameter Store in Step 2. The goal is to ensure the daemon service is properly set up to collect, process, and export your ECS infrastructure metrics and logs to SigNoz Cloud.
As a first step to configure the daemon service, you need to set the environment variable by running the command (using your AWS CLI) below:
export CLUSTER_NAME=<YOUR-ECS-CLUSTER-NAME>
export REGION=<YOUR-ECS-REGION>
export COMMAND=--config=env:SIGNOZ_CONFIG_CONTENT
export SIGNOZ_CONFIG_PATH=/ecs/signoz/otelcol-daemon.yaml
Where,
<YOUR-ECS-CLUSTER-NAME> - Name of your ECS cluster. For example, my-test-cluster
<YOUR-ECS-REGION> - Region in which your ECS cluster is running. For example, us-east-1
Make sure you have CLUSTER_NAME and REGION environment variables set to the proper values before running any aws commands.
Now with the environment variables set, you proceed to run an AWS CloudFormation command to create the stack that represents your daemon service. This command uses the aws cloudformation create-stack for creating a new stack.
Now run the following command (using your AWS CLI) to create the daemon service:
aws cloudformation create-stack --stack-name AOCECS-daemon-${CLUSTER_NAME}-${REGION} \
    --template-body file://daemon-template.yaml \
    --parameters ParameterKey=ClusterName,ParameterValue=${CLUSTER_NAME} \
    ParameterKey=CreateIAMRoles,ParameterValue=True \
        ParameterKey=command,ParameterValue=${COMMAND} \
        ParameterKey=SigNozConfigPath,ParameterValue=${SIGNOZ_CONFIG_PATH} \
    --capabilities CAPABILITY_NAMED_IAM \
    --region ${REGION}
Step 4: Verify Daemon Service
To verify that the daemon service is running, you can run the following command:
aws ecs list-tasks --cluster ${CLUSTER_NAME} --region ${REGION}
You should see the task ARN of the daemon service in the output.
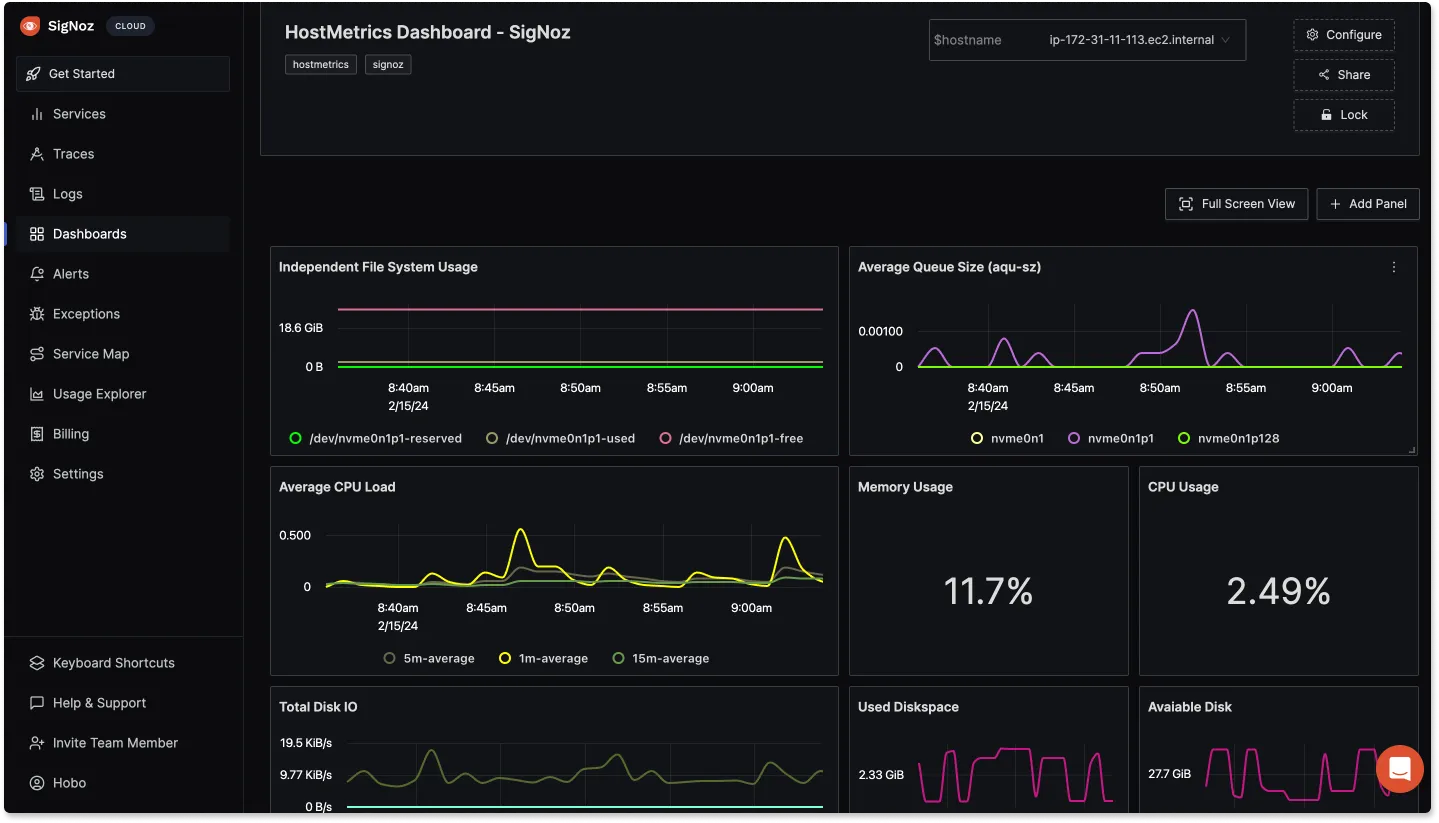
Step 5: Verify Data in SigNoz

(Optional) Step 6: Clean Up
In a cloud environment where resources are billed based on usage, cleaning up resources is crucial. This step involves removing the daemon service and any associated resources that were created during the setup process to collect and forward metrics and logs from your ECS infrastructure to SigNoz. To clean up the daemon service, you can run the following command:
aws cloudformation delete-stack --stack-name AOCECS-daemon-${CLUSTER_NAME}-${REGION} --region ${REGION}
Send Data from Applications
Step 1: Add OpenTelemetry Instrumentation to your Application
To add OpenTelemetry instrumentation to your application, you can follow the docs here.
This step include adding the OpenTelemetry SDK as well as the initialization code to your application codebase and rebuilding the application container image.
Step 2: Add Entrypoint to your Application Container
We need to add an entrypoint to the application container to set the
OTEL_EXPORTER_OTLP_ENDPOINT environment variable to the endpoint of the
daemon service. Such that the application container can send data to the
daemon container running in the same host.
- EC2
- External
Method 1: Updating entrypoint in task definition
We need to obtain the endpoint or IP address of the instance on which the task
is running. We can do this by querying the metadata service of the instance.
For EC2, the metadata service is available at 169.254.169.254.
The entryPoint will look like:
{
      ...,
      "entryPoint": [
        "sh",
        "-c",
        "export OTEL_EXPORTER_OTLP_ENDPOINT=\"http://$(curl http://169.254.169.254/latest/meta-data/local-ipv4):4317\"; <Application Startup Commands>"
      ],
            "command": [],
            ...
}
- Replace
<Application Startup Commands>with the commands to start your application.
Method 1: Updating entrypoint in task definition
We need to obtain the endpoint or IP address of the instance on which the task is running. This can be done by multiple ways depending on the network mode and cloud provider.
The entryPoint will look like the following based on your network mode and cloud provider:
- Using default networking mode i.e. Bridge:
{
      ...,
      "entryPoint": [
        "sh",
        "-c",
        "export OTEL_EXPORTER_OTLP_ENDPOINT=\"http://172.17.0.1:4317\"; <Application Startup Commands>"
      ],
            "command": [],
            ...
} - Using Bridge mode with custom docker network If you are using custom docker networking, you would have to use
ExtraHostsin your task definition.And the{
...
"extraHosts": [
{
"hostname": "signoz-collector",
"ipAddress": "host-gateway"
}
...
]
}entryPointwill look like:{
...,
"entryPoint": [
"sh",
"-c",
"export OTEL_EXPORTER_OTLP_ENDPOINT=\"http://signoz-collector:4317\"; <Application Startup Commands>"
],
"command": [],
...
} - If network mode is not Bridge, and AWS EC2 instance:
{
      ...,
      "entryPoint": [
        "sh",
        "-c",
        "export OTEL_EXPORTER_OTLP_ENDPOINT=\"http://$(curl http://169.254.169.254/latest/meta-data/local-ipv4):4317\"; <Application Startup Commands>"
      ],
            "command": [],
            ...
} - If network mode is not Bridge, and GCP instance:
{
      ...,
      "entryPoint": [
        "sh",
        "-c",
                'export OTEL_EXPORTER_OTLP_ENDPOINT="http://$(curl "http://169.254.169.254/computeMetadata/v1/instance/network-interfaces/0/ip?recursive=true&alt=text" -H "Metadata-Flavor: Google"):4317"; <Application Startup Commands>'
      ],
            "command": [],
            ...
}
NOTES:
- Replace
<Application Startup Commands>with the commands to start your application. - For more information about the metadata server, refer https://www.baeldung.com/linux/cloud-ip-meaning
Step 3: Add Service Name of your Application
To add the service name of your application, you need to set the
OTEL_RESOURCE_ATTRIBUTES environment variable of the application container
to service.name=<your-service-name>.
In your task definition, you can add the following lines.
...
    ContainerDefinitions:
        - Name: <your-container-name>
          ...
          Environment:
            - Name: OTEL_RESOURCE_ATTRIBUTES
              Value: service.name=<your-service-name>
          ...
...
In case of JSON task definition, you can add the following lines.
...
    "containerDefinitions": [
        {
            "name": "<your-container-name>",
            ...
            "environment": [
                {
                    "name": "OTEL_RESOURCE_ATTRIBUTES",
                    "value": "service.name=<your-service-name>"
                }
            ],
            ...
        }
    ],
...
Step 4: Rebuild and Deploy Application Container
After following previous step, you need to rebuild the application container and deploy it to ECS cluster.
Step 5: Verify Data in SigNoz
Prerequisites
- An ECS cluster running with at least one task definition
- Running SigNoz instance - Install SigNoz
- ECS cluster must be either of launch type EC2 or External
- ECS Fargate is not supported yet. We are working on it and will be available soon.
- EC2
- External
Setting up Daemon Service
Step 1: Daemon Service Template
We will use CloudFormation template to create the daemon service with our custom parameters in the Step 3.
Download the daemon-template.yaml:
wget https://github.com/SigNoz/benchmark/raw/main/ecs/ec2/daemon-template.yaml
Setting up Daemon Service
Step 1: Daemon Service Template
We will use CloudFormation template to create the daemon service with our custom parameters in the Step 3.
Download the daemon-template.yaml:
wget https://github.com/SigNoz/benchmark/raw/main/ecs/external/daemon-template.yaml
Step 2: Create SigNoz OtelCollector Config

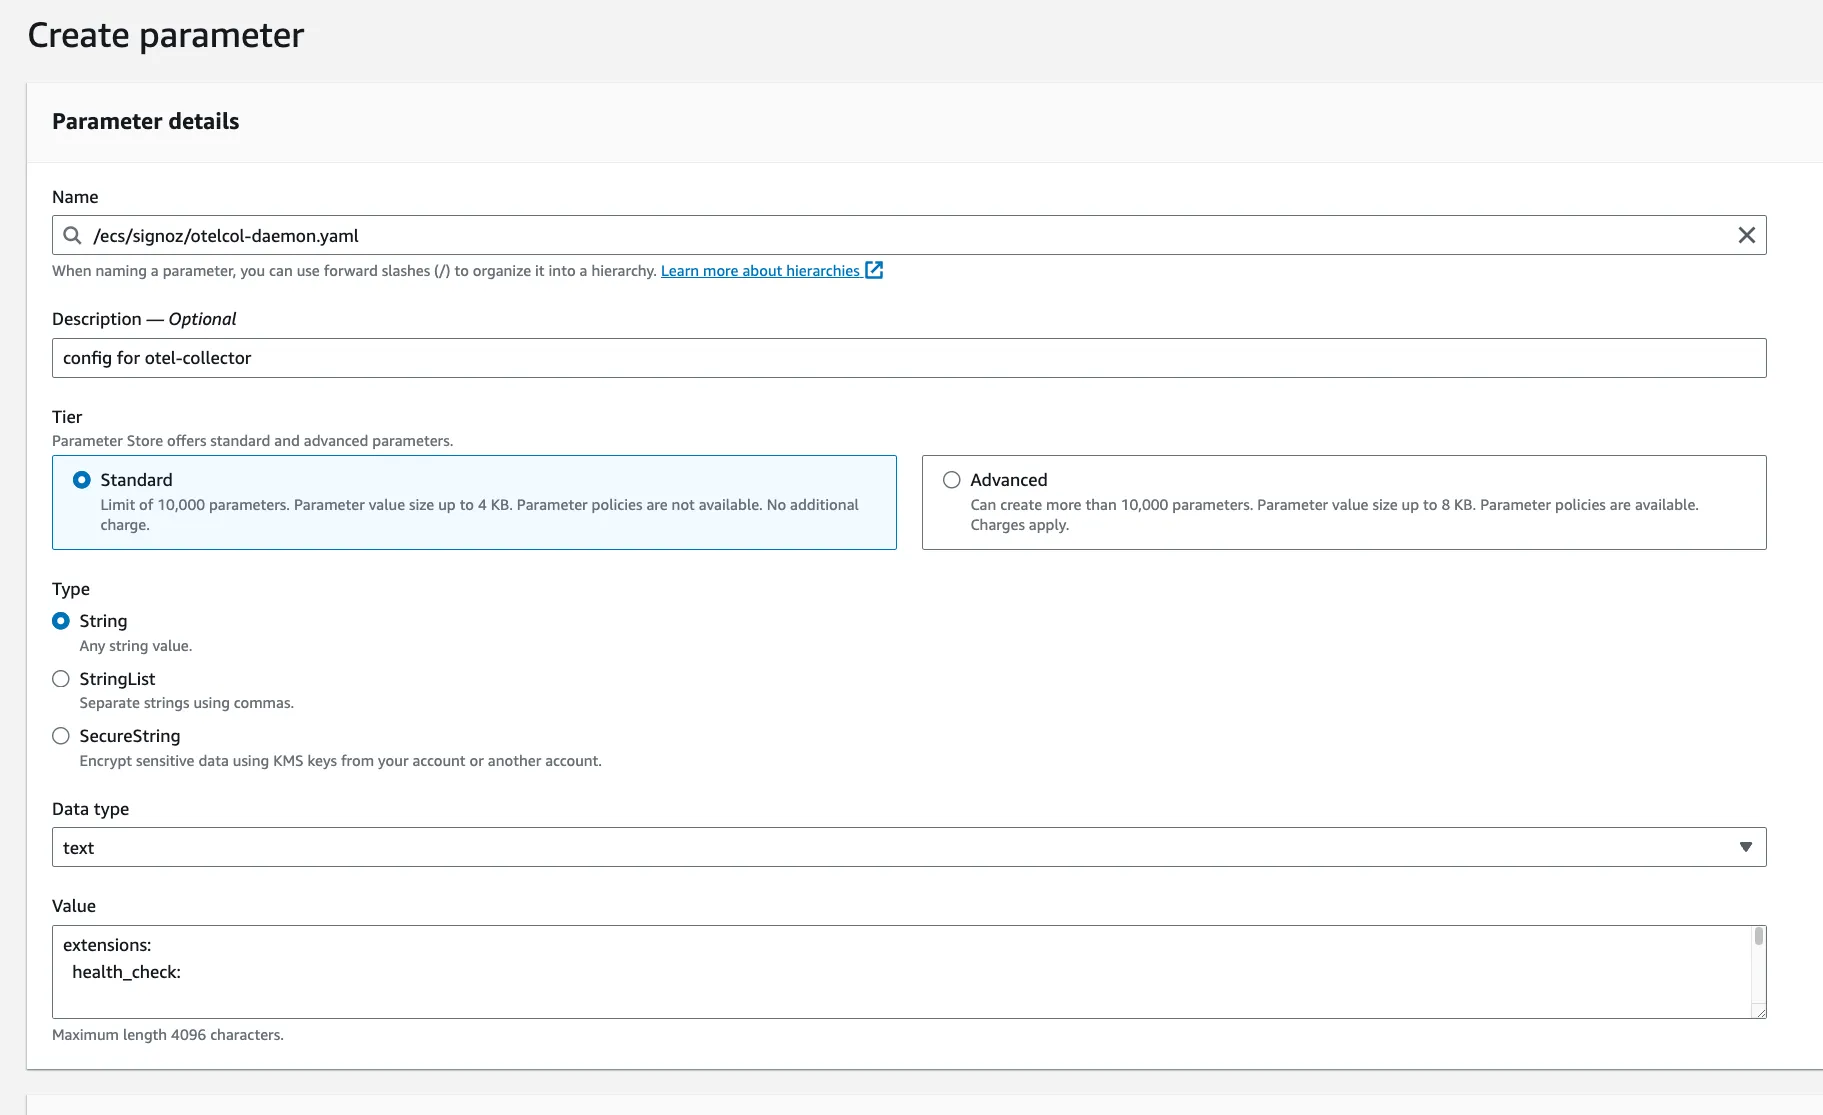
Go to AWS Parameter Store and create a new parameter with the name /ecs/signoz/otelcol-daemon.yaml.
Download the otelcol-daemon-oss.yaml:
wget https://github.com/SigNoz/benchmark/raw/main/ecs/otelcol-daemon-oss.yaml
Update {region} and SIGNOZ_INGESTION_KEY with the proper values in the config
as stated in the Notes section below.
Now, copy the content of the otelcol-daemon-oss.yaml file and paste it in the
value field of the parameter.
Notes:
- Replace
<IP of machine hosting SigNoz>with the address to SigNoz OtelCollector. - After successful set up, feel free to remove
loggingexporter if it gets too noisy.
Step 3: Create Daemon Service
Now configure the daemon service you created in Step 1 with the OpenTelemetry Collector (OTelCollector) configuration you prepared and stored in AWS Parameter Store in Step 2. The goal is to ensure the daemon service is properly set up to collect, process, and export your ECS infrastructure metrics and logs to SigNoz Cloud.
As a first step to configure the daemon service, you need to set the environment variable by running the command (using your AWS CLI) below:
export CLUSTER_NAME=<YOUR-ECS-CLUSTER-NAME>
export REGION=<YOUR-ECS-REGION>
export COMMAND=--config=env:SIGNOZ_CONFIG_CONTENT
export SIGNOZ_CONFIG_PATH=/ecs/signoz/otelcol-daemon.yaml
Where,
<YOUR-ECS-CLUSTER-NAME> - Name of your ECS cluster. For example, my-test-cluster
<YOUR-ECS-REGION> - Region in which your ECS cluster is running. For example, us-east-1
Make sure you have CLUSTER_NAME and REGION environment variables set to the proper values before running any aws commands.
Now with the environment variables set, you proceed to run an AWS CloudFormation command to create the stack that represents your daemon service. This command uses the aws cloudformation create-stack for creating a new stack.
Now run the following command (using your AWS CLI) to create the daemon service:
aws cloudformation create-stack --stack-name AOCECS-daemon-${CLUSTER_NAME}-${REGION} \
    --template-body file://daemon-template.yaml \
    --parameters ParameterKey=ClusterName,ParameterValue=${CLUSTER_NAME} \
    ParameterKey=CreateIAMRoles,ParameterValue=True \
        ParameterKey=command,ParameterValue=${COMMAND} \
        ParameterKey=SigNozConfigPath,ParameterValue=${SIGNOZ_CONFIG_PATH} \
    --capabilities CAPABILITY_NAMED_IAM \
    --region ${REGION}
Step 4: Verify Daemon Service
To verify that the daemon service is running, you can run the following command:
aws ecs list-tasks --cluster ${CLUSTER_NAME} --region ${REGION}
You should see the task ARN of the daemon service in the output.
Step 5: Verify Data in SigNoz
Now, you should see the metrics for your ECS cluster in the dashboard.
(Optional) Step 6: Clean Up
In a cloud environment where resources are billed based on usage, cleaning up resources is crucial. This step involves removing the daemon service and any associated resources that were created during the setup process to collect and forward metrics and logs from your ECS infrastructure to SigNoz. To clean up the daemon service, you can run the following command:
aws cloudformation delete-stack --stack-name AOCECS-daemon-${CLUSTER_NAME}-${REGION} --region ${REGION}
Send Data from Applications
Step 1: Add OpenTelemetry Instrumentation to your Application
To add OpenTelemetry instrumentation to your application, you can follow the docs here.
This step include adding the OpenTelemetry SDK as well as the initialization code to your application codebase and rebuilding the application container image.
Step 2: Add Entrypoint to your Application Container
We need to add an entrypoint to the application container to set the
OTEL_EXPORTER_OTLP_ENDPOINT environment variable to the endpoint of the
daemon service. Such that the application container can send data to the
daemon container running in the same host.
- EC2
- External
Method 1: Updating entrypoint in task definition
We need to obtain the endpoint or IP address of the instance on which the task
is running. We can do this by querying the metadata service of the instance.
For EC2, the metadata service is available at 169.254.169.254.
The entryPoint will look like:
{
      ...,
      "entryPoint": [
        "sh",
        "-c",
        "export OTEL_EXPORTER_OTLP_ENDPOINT=\"http://$(curl http://169.254.169.254/latest/meta-data/local-ipv4):4317\"; <Application Startup Commands>"
      ],
            "command": [],
            ...
}
- Replace
<Application Startup Commands>with the commands to start your application.
Method 1: Updating entrypoint in task definition
We need to obtain the endpoint or IP address of the instance on which the task is running. This can be done by multiple ways depending on the network mode and cloud provider.
The entryPoint will look like the following based on your network mode and cloud provider:
- Using default networking mode i.e. Bridge:
{
      ...,
      "entryPoint": [
        "sh",
        "-c",
        "export OTEL_EXPORTER_OTLP_ENDPOINT=\"http://172.17.0.1:4317\"; <Application Startup Commands>"
      ],
            "command": [],
            ...
} - Using Bridge mode with custom docker network If you are using custom docker networking, you would have to use
ExtraHostsin your task definition.And the{
...
"extraHosts": [
{
"hostname": "signoz-collector",
"ipAddress": "host-gateway"
}
...
]
}entryPointwill look like:{
...,
"entryPoint": [
"sh",
"-c",
"export OTEL_EXPORTER_OTLP_ENDPOINT=\"http://signoz-collector:4317\"; <Application Startup Commands>"
],
"command": [],
...
} - If network mode is not Bridge, and AWS EC2 instance:
{
      ...,
      "entryPoint": [
        "sh",
        "-c",
        "export OTEL_EXPORTER_OTLP_ENDPOINT=\"http://$(curl http://169.254.169.254/latest/meta-data/local-ipv4):4317\"; <Application Startup Commands>"
      ],
            "command": [],
            ...
} - If network mode is not Bridge, and GCP instance:
{
      ...,
      "entryPoint": [
        "sh",
        "-c",
                'export OTEL_EXPORTER_OTLP_ENDPOINT="http://$(curl "http://169.254.169.254/computeMetadata/v1/instance/network-interfaces/0/ip?recursive=true&alt=text" -H "Metadata-Flavor: Google"):4317"; <Application Startup Commands>'
      ],
            "command": [],
            ...
}
NOTES:
- Replace
<Application Startup Commands>with the commands to start your application. - For more information about the metadata server, refer https://www.baeldung.com/linux/cloud-ip-meaning
Step 3: Add Service Name of your Application
To add the service name of your application, you need to set the
OTEL_RESOURCE_ATTRIBUTES environment variable of the application container
to service.name=<your-service-name>.
In your task definition, you can add the following lines.
...
    ContainerDefinitions:
        - Name: <your-container-name>
          ...
          Environment:
            - Name: OTEL_RESOURCE_ATTRIBUTES
              Value: service.name=<your-service-name>
          ...
...
In case of JSON task definition, you can add the following lines.
...
    "containerDefinitions": [
        {
            "name": "<your-container-name>",
            ...
            "environment": [
                {
                    "name": "OTEL_RESOURCE_ATTRIBUTES",
                    "value": "service.name=<your-service-name>"
                }
            ],
            ...
        }
    ],
...
Step 4: Rebuild and Deploy Application Container
After following previous step, you need to rebuild the application container and deploy it to ECS cluster.